Custom HubSpot Forms with Next.js and Shadcn
Create unique forms with Hubspot.
Table of Contents
HubSpot offers a powerful tool for marketing, enabling us to efficiently manage our marketing efforts while developing our product. One of its most popular features is the HubSpot forms, which can be embedded on websites or in emails. These forms facilitate automatic workflows, lead management, and lead history tracking.
Despite our appreciation for HubSpot, there are two significant issues:
- You cannot freely design form elements (there are predefined styles)
- Embedding forms can slow down the website or page.
We can address these problems using Next.js and Shadcn
I assume you are already familiar with Next.js and Shadcn. If you are not you can click and read the docs.
Setting Up the Environment
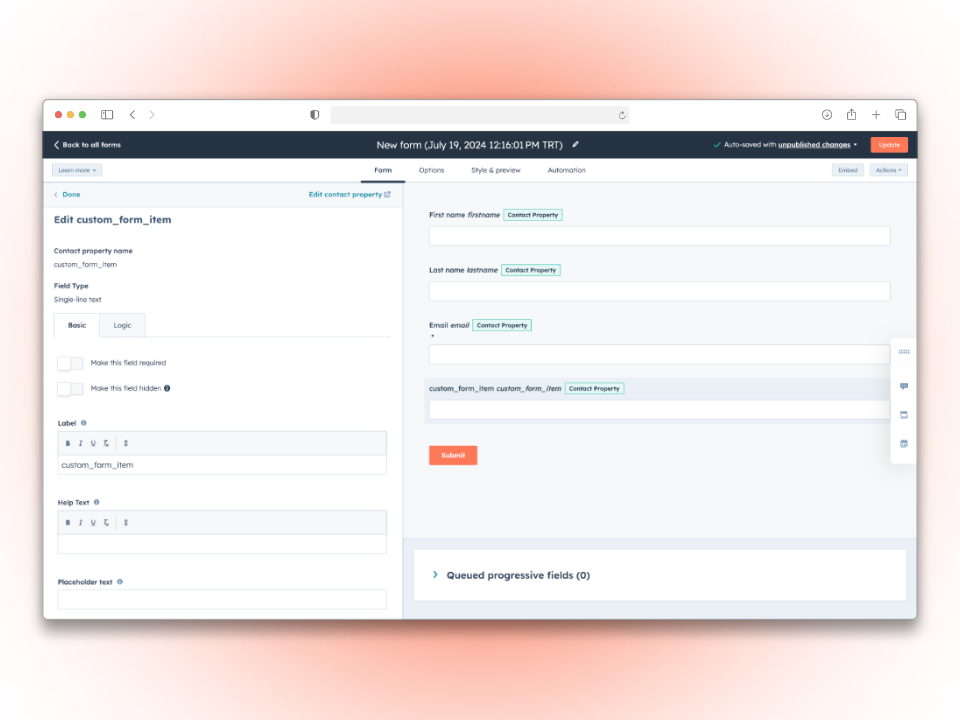
First, we need to create a form in HubSpot. You can choose any form type; we only need the portal ID and form ID.
Setting Up the HubSpot Form
Create custom fields as needed, ensuring that the field names match the italicized parts when sending the form to HubSpot.

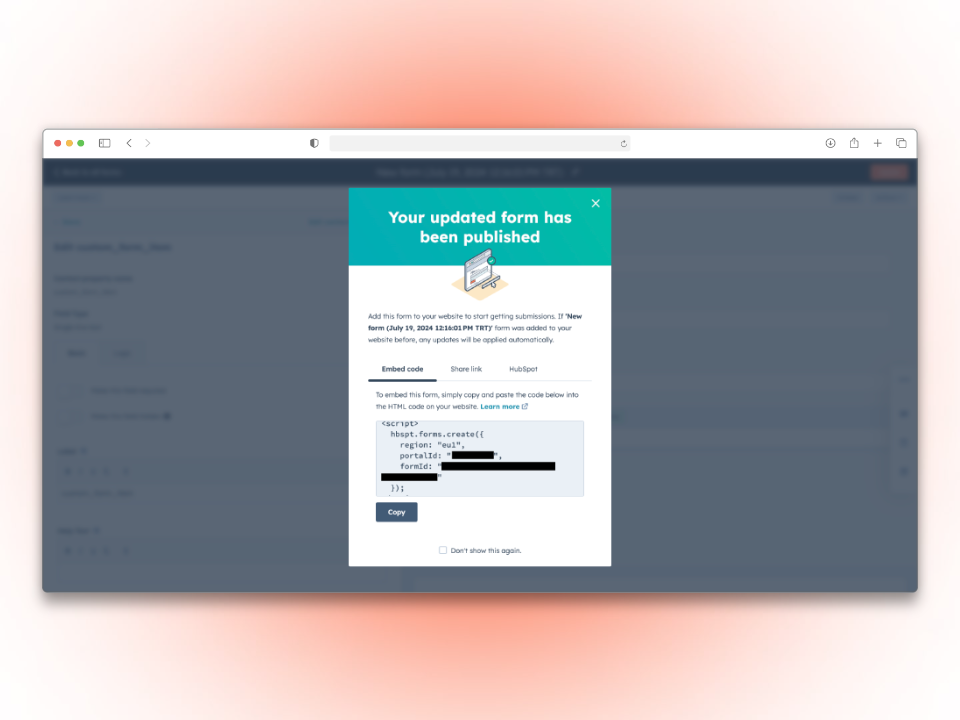
Publish the form and note the portalId and formId

Installing Required Packages
Install the necessary form components from Shadcn. In this example, we'll use text input. We'll also use react-hook-form and zod.
npx shadcn-ui@latest add form

npx shadcn-ui@latest add input

npx shadcn-ui@latest add button
Creating the Form Page
Let's build the form page.
"use client";

import { useForm } from "react-hook-form";
import { zodResolver } from "@hookform/resolvers/zod";
import { z } from "zod";

import { Button } from "@/components/ui/button";
import {
  Form,
  FormControl,
  FormDescription,
  FormField,
  FormItem,
  FormLabel,
  FormMessage,
} from "@/components/ui/form";
import { Input } from "@/components/ui/input";

const formSchema = z.object({
  firstname: z.string().min(3, {
    message: "First name is required",
  }),
  lastname: z.string().min(3, {
    message: "Last name is required",
  }),
  phone: z.string(),
  email: z.string().email("Invalid email address"),
  custom-form-field: z.string()
});

export default function FormPage() {

  const form = useForm<z.infer<typeof formSchema>>({
    resolver: zodResolver(formSchema),
    defaultValues: {
      firstname: "",
      lastname: "",
      phone: "",
      email: "",
      custom-form-field: "",
    },Ï
  });

  async function onSubmit(values: z.infer<typeof formSchema>) {
    console.log("Form Values", values)
  }

  return (
    <Form {...form}>
         <form
            onSubmit={form.handleSubmit(onSubmit)}
            className="space-y-4 w-full "
          >
            <div className="flex justify-between gap-4">
              <FormField
                control={form.control}
                name="firstname"
                render={({ field }) => (
                  <FormItem className="w-full">
                    <FormLabel>Firstname</FormLabel>
                    <FormControl>
                      <Input placeholder="John" {...field} />
                    </FormControl>
                    <FormMessage />
                  </FormItem>
                )}
              />
              <FormField
                control={form.control}
                name="lastname"
                render={({ field }) => (
                  <FormItem className="w-full">
                    <FormLabel>Lastname</FormLabel>
                    <FormControl>
                      <Input placeholder="Doe" {...field} />
                    </FormControl>
                    <FormMessage />
                  </FormItem>
                )}
              />
            </div>
            <FormField
              control={form.control}
              name="phone"
              render={({ field }) => (
                <FormItem>
                  <FormLabel>Phone</FormLabel>
                  <FormControl>
                    <Input placeholder="+1234567890" {...field} />
                  </FormControl>
                  <FormMessage />
                </FormItem>
              )}
            />
            <FormField
              control={form.control}
              name="email"
              render={({ field }) => (
                <FormItem>
                  <FormLabel>Email</FormLabel>
                  <FormControl>
                    <Input placeholder="john.doe@example.com" {...field} />
                  </FormControl>
                  <FormMessage />
                </FormItem>
              )}
            />
            <FormField
              control={form.control}
              name="custom-form-field"
              render={({ field }) => (
                <FormItem>
                  <FormLabel>Custom Form Field</FormLabel>
                  <FormControl>
                    <Input
                      {...field}
                    />
                  </FormControl>
                  <FormMessage />
                </FormItem>
              )}
            />

            <Button type="submit">
              Submit
            </Button>
          </form>
        </Form>
    )
We have created the necessary form fields and structure to validate the form before sending it to HubSpot.
Sending the Form to HubSpot
Now, let's focus on the form submission function. It will be straightforward and effective.
async function onSubmit(values: z.infer<typeof formSchema>) {
    const portalId = "Portal ID";
    const formGuid = "Form ID"

    try {
      const response = await fetch(
        `https://api.hsforms.com/submissions/v3/integration/submit/${portalId}/${formGuid}`,
        {
          method: "POST",
          headers: {
            "Content-Type": "application/json",
          },
          body: JSON.stringify({
            submittedAt: Date.now(),
            fields: [
              { name: "firstname", value: values.firstname },
              { name: "lastname", value: values.lastname },
              { name: "phone", value: values.phone },
              { name: "email", value: values.email },
              { name: "custom-form-field", value: custom-form-field },
            ],
            context: {
              hutk: document.cookie.replace(
                /(?:(?:^|.*;\s*)hubspotutk\s*=\s*([^;]*).*$)|^.*$/,
                "$1"
              ),
              pageUri: window.location.href,
              pageName: document.title,
            },
          }),
        }
      );


      if (!response.ok) {
        throw new Error(`HTTP error! status: ${response.status}`);
      }

      const result = await response.json();
      console.log(result);
    } catch (error) {
      console.error("Form submission error:", error);
    }
  }
This function sends a POST request to the HubSpot v3 form API with the necessary credentials and fields, automatically triggering HubSpot to save the lead.
Handling the Result and Additional Features
We need to inform the user whether the form submission was successful. To do this, we'll set a state to keep track of the result and another to disable the submit button while waiting for the result, preventing multiple submissions.
Add these lines to the file:
import { useState } from "react";

export default function FormPage() {
  const [loading, setLoading] = useState<boolean>(false);
  const [result, setResult] = useState<any>(null);

  async function onSubmit(values: z.infer<typeof formSchema>) {
    setLoading(true);

    ...

    setLoading(false);

    if (!response.ok) {
      throw new Error(`HTTP error! status: ${response.status}`);
    }

    const result = await response.json();
    setResult(result);\

    ...

}

return (
    <div className="flex flex-col justify-center items-center gap-5">
       //Form Part
       {result && (
          <div
            dangerouslySetInnerHTML={{ __html: result.inlineMessage }}
            className="bg-green-200 text-black p-3 rounded-xl"
          />
        )}
      </div>
)
}
That's all for now. Feel free to email me if you have any questions or need further assistance.
Happy coding!